Wednesday, August 25, 2010

Drunken Battleship

This post is completely unrelated to the current steampunk projects, but I have had a lot of requests for how to make it.

The finished game is played just like traditional battleship, but with shot glasses or beer cups as the game pieces.

SUPPLIES:
1 Tri-fold display board (35.5"x46", with folds at 11.5" in from the sides)
1 Piece of foam posterboard that is 1/4" - 1/2" thick
2 Pieces of  regular poster board
20 Shot Glasses (up to 4 different colors)
50+ Pushpins (2-4 different colors, minimum 20 of each)
Permanent Marker (or large-scale printer capability)
Glue Stick
Mass Quantities of Alcohol

CONSTRUCTION:
Begin by cutting your tri-fold display board in half, separating top from bottom. Dimensions will now be 46" wide x 17.75"tall.
Cut your foam posterboard to 23" x 17.75" and glue this in between the two pieces of tri-fold board so that they are back-to-back.
Print the image to the right or draw it onto both sections of the tri-fold board.
Take both pieces of regular posterboard, and cut them to a minimum size of 17.75" x 23". It is easiest if you cut them to fit the table you intend to play on, as the game board can be scaled.
Print the Image to the right, or draw it onto both pieces of regular posterboard. You may scale the image, but make sure each square is big enough to place a shot glass into, and that the whole board is no wider than can be hidden by the tri-fold board.
If you can, I recommend laminating or otherwise protecting these individual pieces of posterboard, as this is where the shot glasses will be set, and drunk people tend to spill a little.

TO PLAY:
Set the tri-fold set-up in the middle of a table. With the outside flaps open, it should stand up on its own. Place the laminated pieces of posterboard in front of each side of the tri-fold.
Separate your push pins so that each player has 2 colors, with at least 20 of each color. Push one pin into the "Miss" dot, and one into the "Hit" dot to establish a key for the players.
If you have different colored shot glasses, the best approach is to give each player different colors to represent each ship. (ie: 4 blue, 3 red, 2 green, 1 yellow). There is no need for the colors to match for each player. I bought a multi-color set of plastic shot glasses from the grocery story for $3, and I used 2 sets. We also used 2 shot glasses per player to put the push-pins in.
Have a pitcher on hand filled with a mixed drink for people to fill the shot glasses with, because you won't want to use straight liquor (for long, at least). We also kept paper towels on hand for the inevitable spills.
Players will mark hits and misses by pushing pins into the board between them (hence the foam board in between). And sunken ships are marked by pushing a pin directly into the foam board layer from the top.

Tuesday, August 24, 2010

Put a Button over it

Yeah, that's the great thing about steampunk. If you screw up, you can put a gear or a brass button over it.

Crystal has started the sewing of her pleather corset, and Sam is currently disassembling a clock which my dad donated to salvage the gears. I just finished making a blue lace choker which I am rather proud of. This thing has been taking up all of my crochet efforts for the past couple of weeks, and I am thoroughly happy to see it finished.


 Here's how it looks when its on:


I found the pattern through Ravelry: http://www.theanticraft.com/archive/lugh06/asphyxiation.htm
I would eventually like to add a brass button or copper gear to the center of the rosette.
I did modify the pattern by adding a few ch5 loops to secure the rosette to the individual motifs, and I added some ch10 loops for button holes.

Sunday, August 22, 2010

Help from Dad

Ok, so I got Dad interested in helping to build the steampunk stuff. Which is great, because he knows way more about hardware than I can shake a stick at. He let me do through boxes of spare parts that he had in the garage, and took me to Home Depot to fill in the gaps. Donna also got into it, donating an old 80's vest to the cause. It was already covered in gold and silver buttons of every shape and size, so it looked steampunk enough. I tore of the plastic looking pieces and intend to replace them with buttons or gears.

Here is the start of my "backpack":
Got some aluminum duct stuff from home depot, plus a plastic freezer mug I got from goodwill. We cut the handles off the mug with a handsaw, and sanded down the stumps. Then we cut the aluminum ducts to be as tall as my backpack should be. That part is still in progress, but we drilled copious holes in the scrap segments and put those inside the mugs with battery power christmas lights. Its nowhere near finished, but its definitely a start.


Anyways, I drove back to Missouri today, and was able to share the boxes and bags of scrap pieces with Sam and Crystal. Crystal was pretty busy working on cutting out the pieces for her pleather corset, but Sam couldn't help digging into the pieces and building his gun.

Here is Sam trying on the vest and the coat I brought back, and then with the gun he made in about 2 hours out of the scrap boxes. The only tools required were a pair of tin-snips (loaned to me from dad) and a screw driver. The hose will eventually connect to his back pack. The base of the gun is a flint spark igniter gun that was for my dad's hot air balloon. It still sparks, but dad said it didn't work well enough for him to use, so he donated it.

Friday, August 20, 2010

Raiders of the Lost Costume Closet


Got to Michigan around 2pm today. Dad was on a conference call, so I amused myself by raiding what is left of my once glorious costume closet. Yes, the really impressive victorian pieces (a lace/velvet overcoat, and an underskirt made of LAYERS of pleated silk) either got donated to the theater or ran away with Julia, but there were still some good pieces yet to be had.

The Black lace shirt is REALLY pretty, its just WAY too small for me. I picked it up at salvation army years ago for my sister, but since then my step-sister has been the only one small enough to wear it. I would guess its a size 6. The coat is my dad's old Make-we-merry piece. I think it would look good with a hat or belt, but those are easy enough to come by. The last dress is one we used as our "victorian school girl's wear". It is full length, and stretchy, so i think it fit me when i was a size 12, but i didn't bother trying it on too see.

This skirt made me SO happy to find it! It has been in storage for so long that I think the trim is starting to come off, but that is an easy fix. The panel in the front has a matching vented panel in the back which makes a slight train. So pretty, but it doesn't fit me anymore. I have several sets of hooks-and-eyes in the back, so I think it will fit sizes 6-8, maybe smaller. It doesn't fit me though :(

Like I said, some of the really nice pieces have disappeared, but they may turn up in some other area of the house. There is also the chance that I can get them back from the theater if I really get desperate.

I plan to raid the workshop and see if there are any useful metal pieces laying around that I may be able to get my hands on. If I am really lucky, I can get my dad re-interested in victorian costuming and the whole steampunk thing, and he'll help me out with some of the metal and wood work.

Wednesday, August 18, 2010

Clay and Paint

So we got some sculpy brand clay at Joann's the other day for about $2.50. Also bought some metallic acrylic paints for about $2 a bottle. We were able to mold and model about 20 gears out of the block of clay, and painted them after they baked. The paints we bought were by Deco art, and the copper color (worn penny) was awesome. The gold and silver were thin and took 3 or 4 coats. I dug out another bottle of silver I had from a different project, but it was just as thin. All together, though, it just took some extra patience. I think spray paint will be the way to go once we use up the acrylics that I bought.

Tuesday, August 17, 2010

Goodwill = Win

Went to goodwill after my final today, Vicky went with me to help search out things that might qualify for victorian costuming.

Here's what we found:


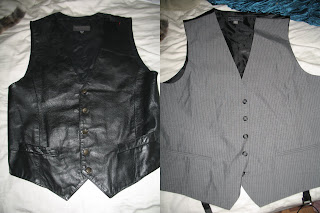
Leather vest is a men's Large, Grey pinstripe is a Mens XL
I liked the yellow/brown skirt, think it will match copper accessories well.
Its not floor-length on me, but it will look awesome when its picked-up.

The teal is a nicer material, but shorter.
Probably good for layering or bustling


These shirts were a great find.
The lace one on the left is perfect for under a corset/cincher. (Sm/M)
The one on the right has the high neck and buttons. (M/L)
Both are very victorian and will match any colors.
I liked the black dress mostly for the waistband,
would look great as a top with lace at the collar. (sz 8)
White one will look good as is. (sz 12)

Adventures in Steampunk

So, the plan is to make steampunk costumes for Gencon 2011 and any other occaision where we can find to wear said costumes. I am still hopeful that the costume closet i left behind in michigan will have some remnants of victorian costuming from bygone days, but I can't count on it.

Bought some modeling clay at Joann's the other day, and let Sam and Crystal go at the molding and cutting of said clay into gears and cogs. Painted those a bit last night and they look pretty good. I'm hoping to apply the make-and-paint concept to random other artifacts that don't involve me spending a fortune on actual gears and such.

Still working on making lace with the blue lace-weight yarn I got from Meg ages ago. I also bought a bunch of metallic thread for the purpose of lace-making, but its terrible to work with. Thinking embroidery may be the only way to go with that.